[iOS] PDF Viewer Buttons
Posted in iOS Updated on .
Written by Christoph Mantler
iOS Document Browser
iPad (Landscape):

iPhone:
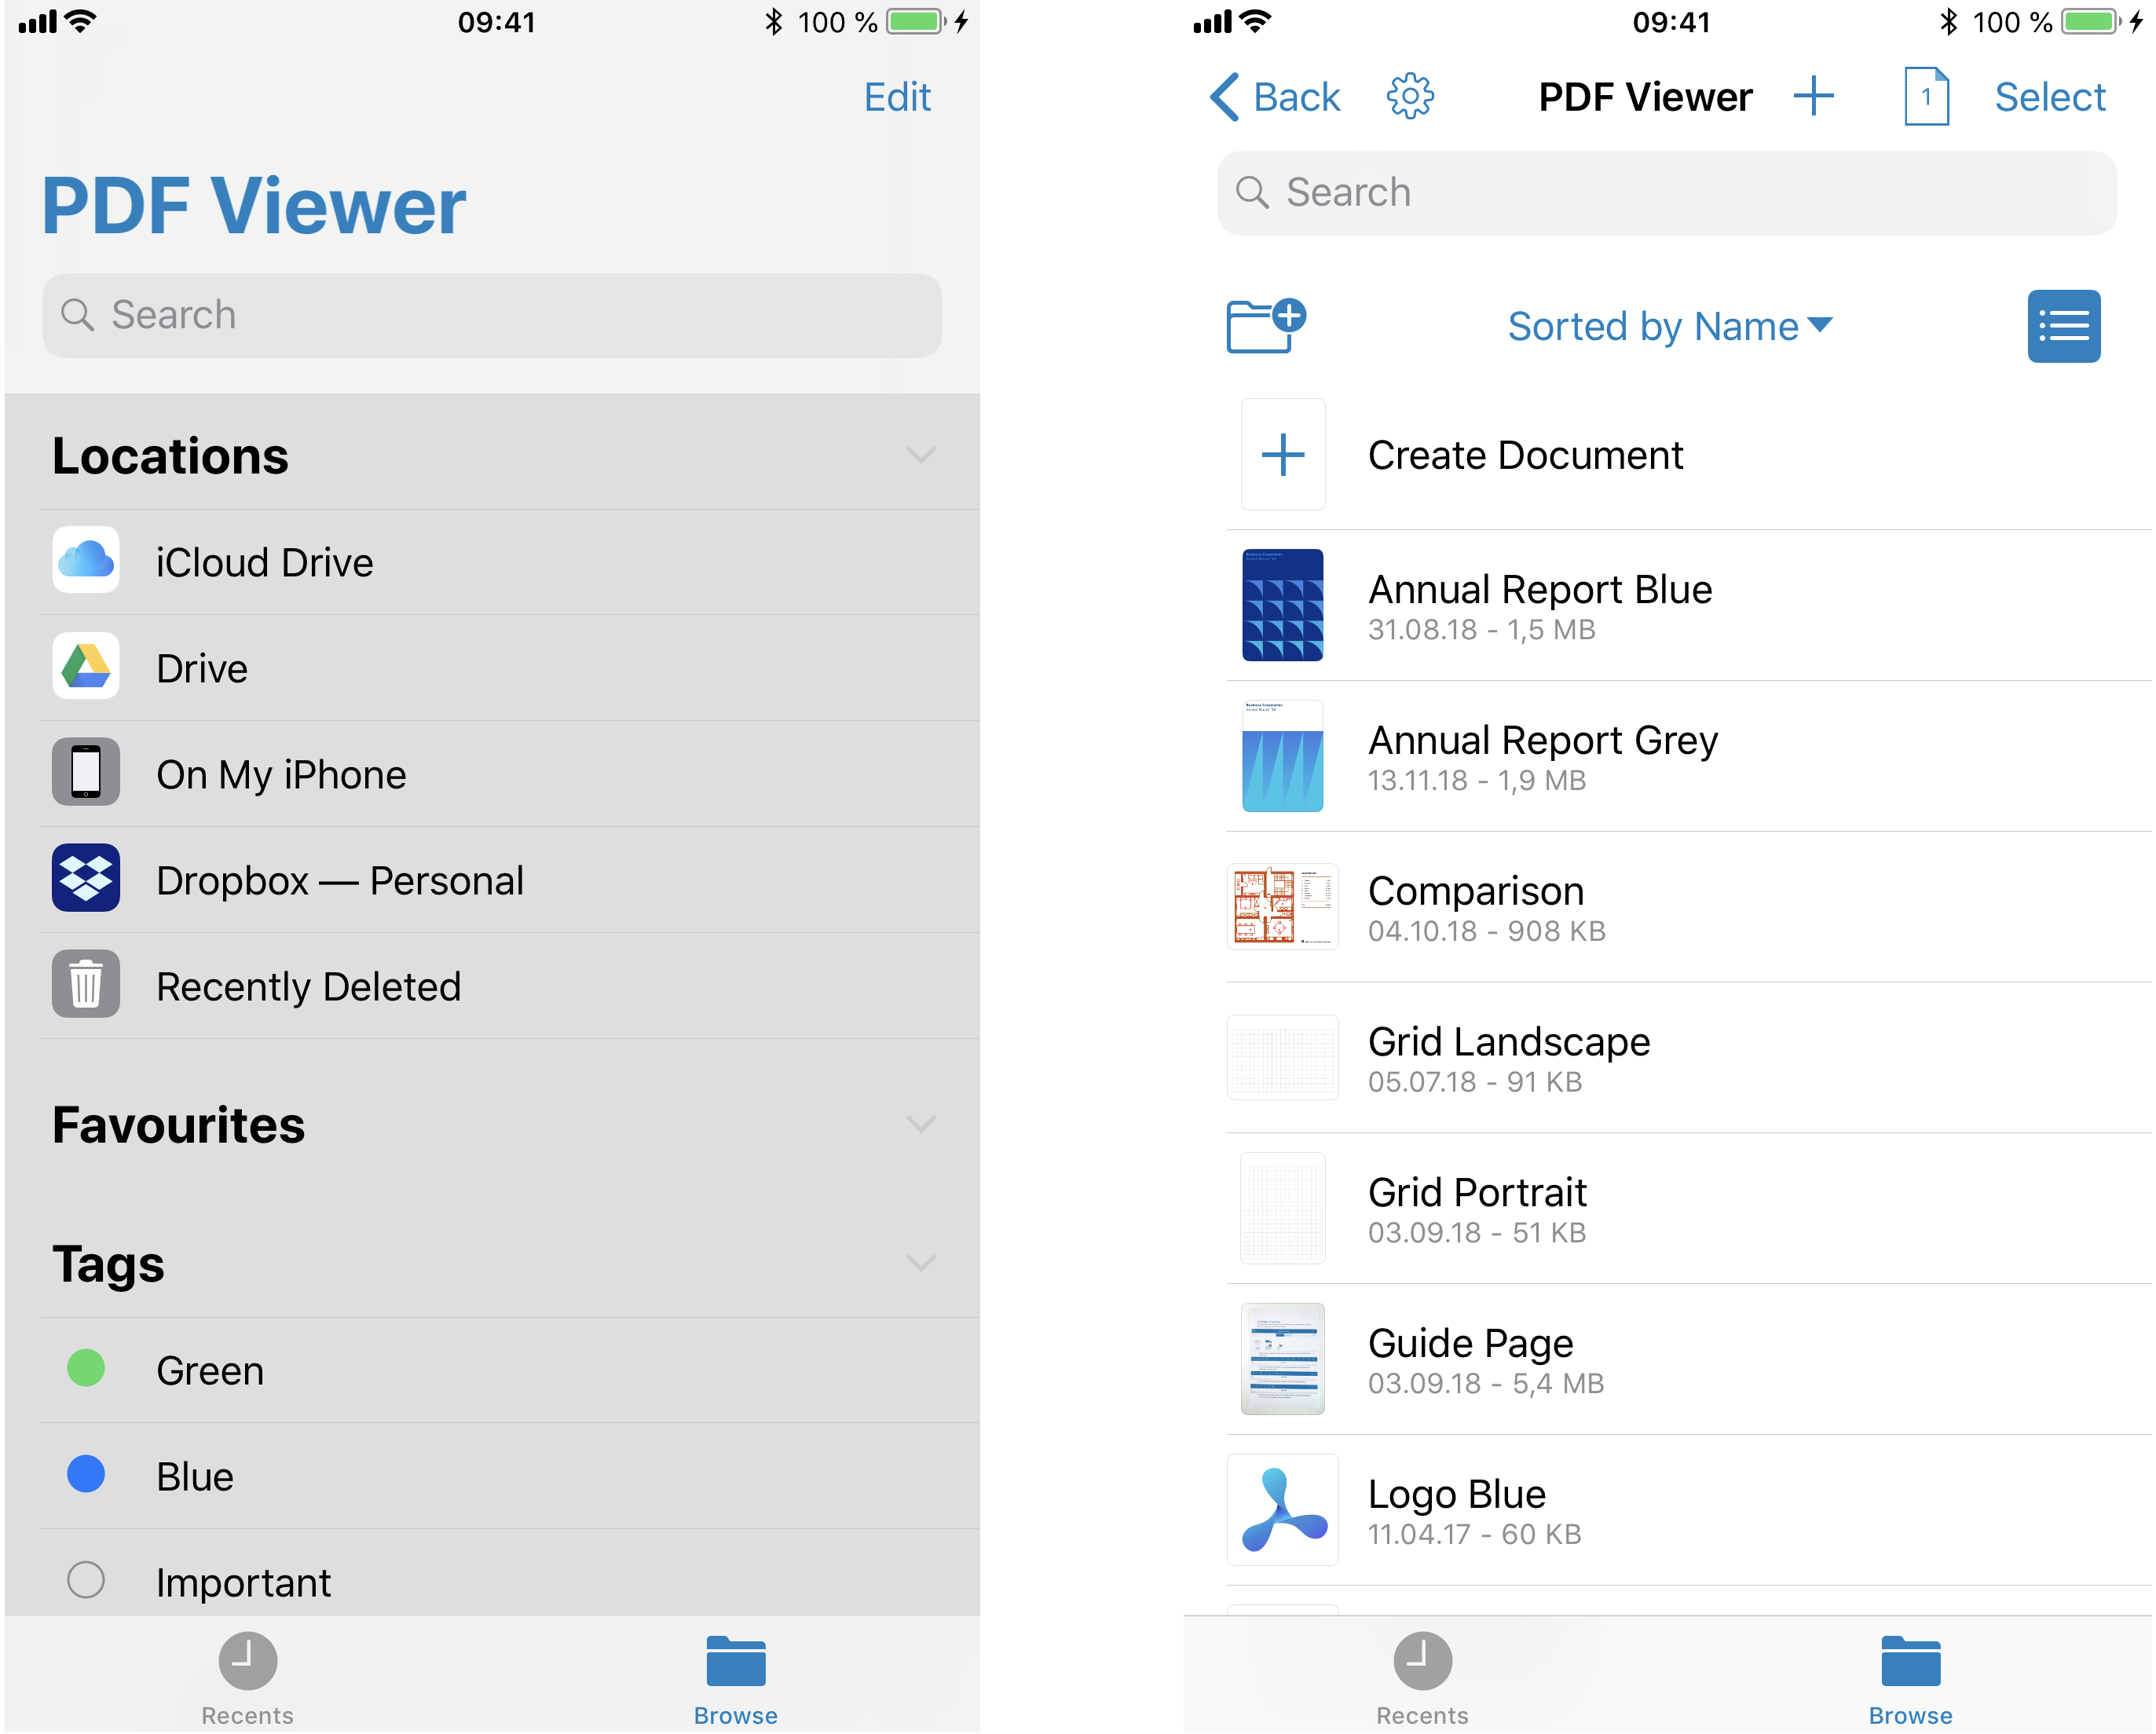
Locations:
This is where all your files are stored. It can be locally, in iCloud Drive, or on various 3rd-Party services like Dropbox or Google Drive.
Favourites:
You can mark folders as favourites by long-pressing on them and then tapping "Favourite" in the submenu.
Tags:
You can tag documents and folders by longs-pressing on them and then tapping on "Tags" in the submenu. Afterwards a small window will appear where you can choose tag you want.
Note: This currently doesn't work for folders due to a bug from Apple with the iOS 11 Document Browser. We already reported that and are hoping for a fix.
Top Toolbar:
Note: Buttons explained from left to right.
Back Button:
Displays the name of the Folder/Location where you can go back to. Tapping it will go back to that location.
Settings Button:
This will open the app settings where you can choose between themes, contact us via the in-app feedback chat and customize the app a little in the "Advanced" options.
Current Location:
Is displayed in the middle of the toolbar. It shows where you currently are in the document browser.
Plus Button:
Lets you create a new document.
Opened Tabs:
This button (white sheet with the number of opened tabs in it) is only visible if there are open documents. Tapping it will direct you to your already open PDFs.
Select:
Lets you select folders and files so you can perform certain actions on them, like Open, Share, Duplicate, Move, or Delete.
Organization Bar:

Note: This is explained from top to bottom, then left to right.
Search Bar: Lets you search for the name of a PDF.
Create Folder Button: Lets you create a new Folder.
Name: Sorts the documents and folders alphabetically. (Initially A-Z. When tapping again it sorts from Z-A.)
Date: Sorts the documents and folders by the date when they were last changed. (Initially newest first. When tapping again it starts with oldest first.)
Size: Sorts the documents and folders by size. (Initially from big to small. When tapping again it sorts from small to big.)
Tag: Sorts the documents and folders by tag. (Initially shows tagged documents on top. When tapping again it shows not tagged documents on top and tagged ones at the bottom.)
List View Button: Tapping it displays all PDFs and folders in a list view. When tapping again it shows the documents in a grid view.
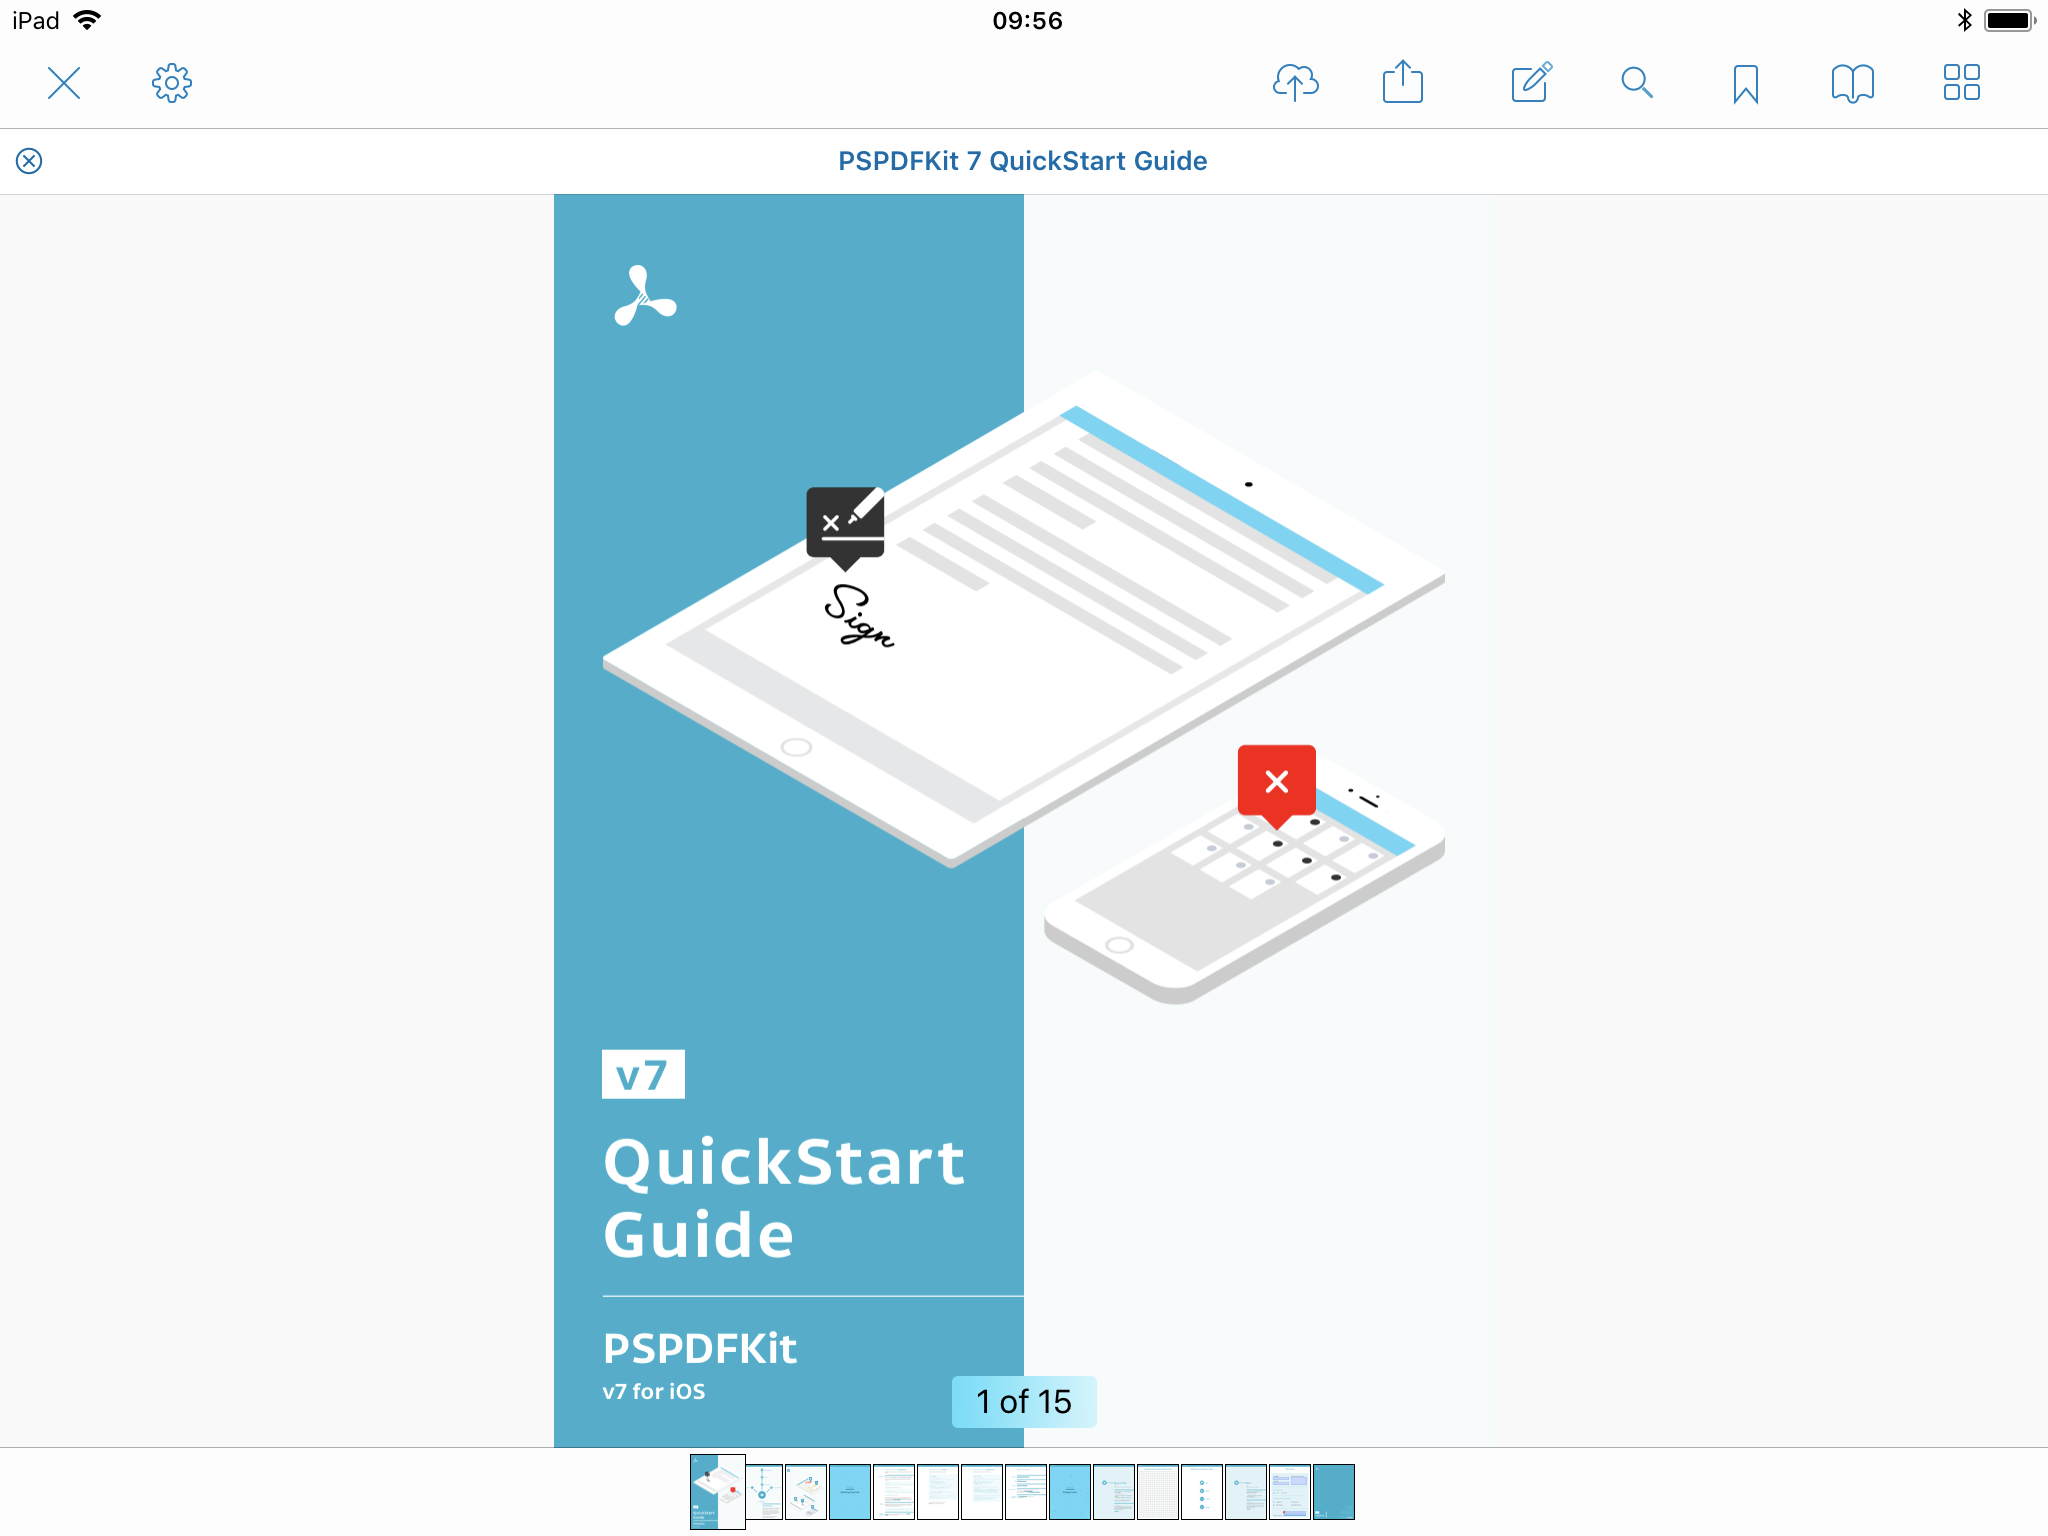
PDF Page View
iPad (Landscape):
iPhone:

Tabbed Bar:
The tabbed bar shows all currently open PDFs. You can switch between them by tapping on a tab. You can also re-arrange tabs by long-pressing on them and then moving them to your desired order. The tabbed bar only has one button, the close button.
Close Button: Tapping on it closes the tab where it's attached. Long pressing on the button will reveal a submenu where you can either choose to close all tabs, or to close all tabs except for the current one.
Top Toolbar:
Note: Buttons explained from left to right.
Close Button:
Tapping this buttons closes the current document.
Settings Button:
Opens the document settings where you can change settings like the App Theme, Page Mode, Page Transition, Scroll Mode, Appearance, and Brightness.
Export Button:
This button has been removed because this functionality is now part of the Share button.
Share Button:
Lets you share the PDF to other devices and apps. Also allows printing the PDF and various other default iOS activities.
Annotation Tools Button:
Tapping this button will reveal the annotation toolbar. (Detailed description about the annotation toolbar below)
Search Button:
Lets you search for specific words, phrases, etc in your PDF.
Bookmark Button:
Tapping it will add a bookmark to the current page.
Outline and Document Info Button:
Open a window/table with 3 tabs: Outline (if the PDF has one), Bookmarks, Annotations). Tapping on any of the contents of each tab will lead you to the page where the outline, bookmark, or annotation is.
Thumbnail Grid Button:
Tapping this will change the document to a thumbnail view, where you can see all pages and also allows to enter the document editor. (More about the document editor below)
More Button:
Looks like a paper sheet with 3 vertical dots in it. This is a special case for the iPhone, as it doesn't provide enough space to display all the buttons. Tapping this button will reveal several other buttons in a submenu: Export, Share, Search, Options, and Add Bookmark.
Bottom Toolbar:
This is also called the "Scrubber Bar", which can be used to navigate around in the PDF. Tapping on a page will scroll to that page. Long-pressing will allow you to scroll very quickly through the pages.
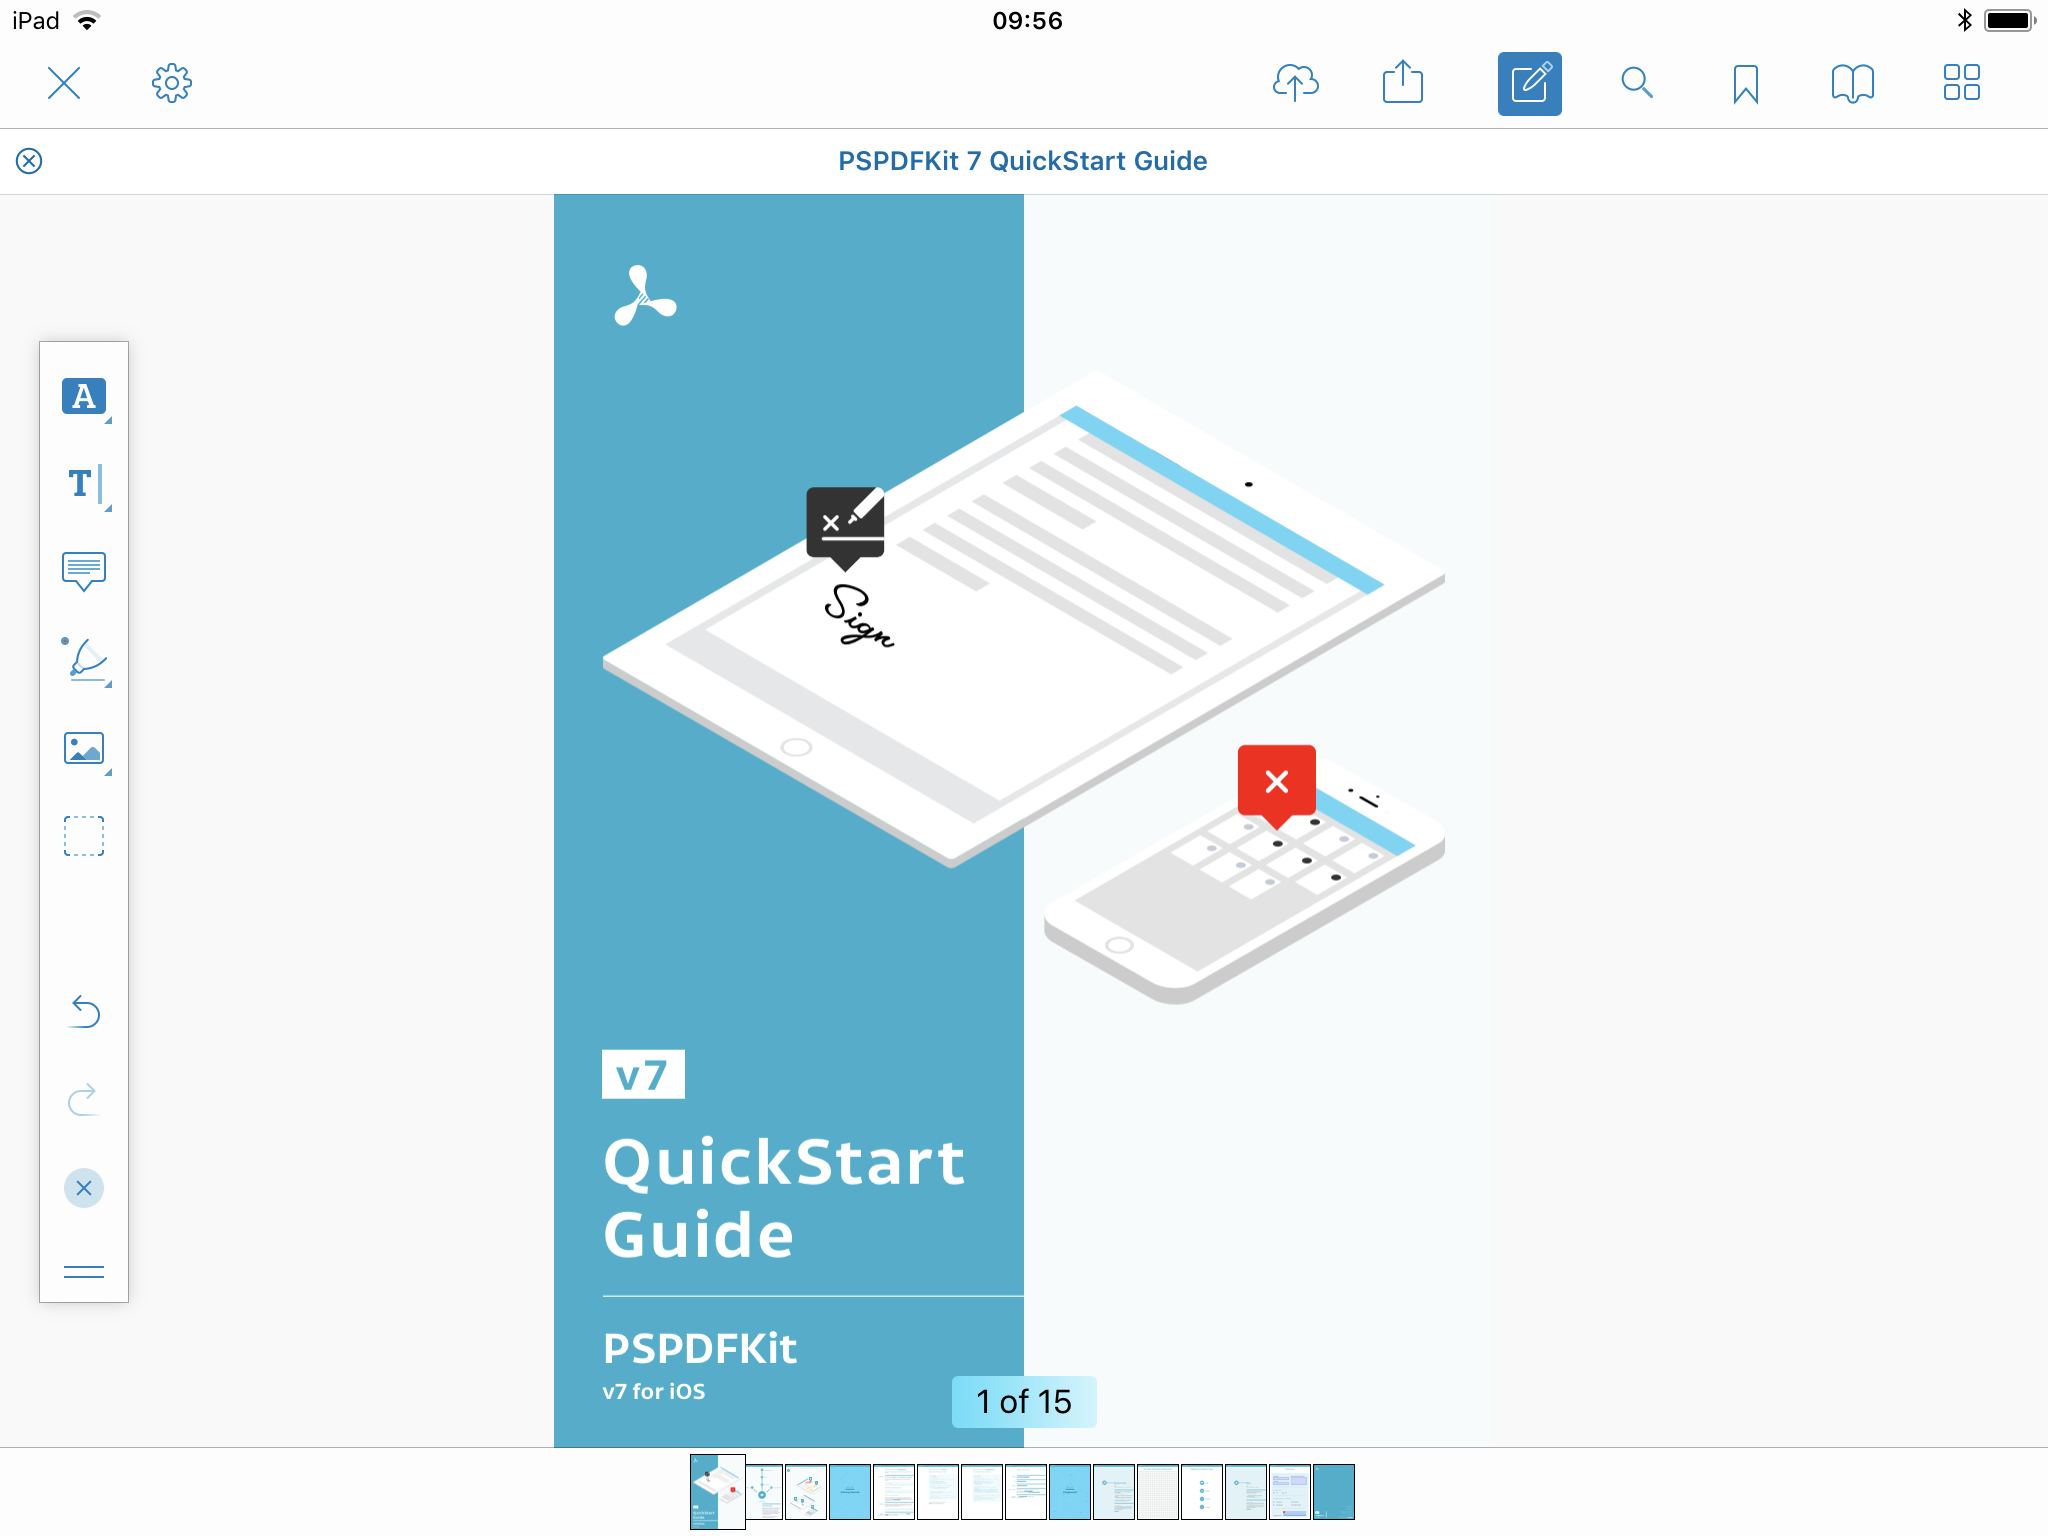
Annotation Toolbar
iPad:
iPhone:
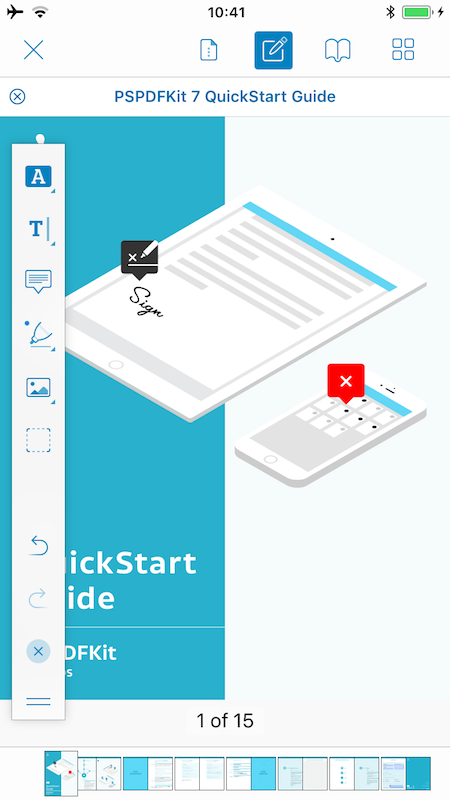
The annotation toolbar is one of the most commonly used parts of PDF Viewer. It is flexible and can be docked either to the left, the top, or the right side of your screen. The appearance can vary a lot, depending on screen size, device orientation, or the position of the annotation toolbar.
Because there are so many annotation tools in PDF Viewer, we again have to group certain buttons to be able to provide a compact and efficient design. Groups are indicated by the small triangle in the bottom-right corner of a tool button. To switch between tools in a group, long press on the button in the annotation toolbar. The most common grouping is as follows:
Note: Grouping Buttons are explained from top to bottom. Annotation Tool Buttons inside the Grouping Buttons are explained from left to right.
Text Markup Button:
In there are all tools that you need for highlighting the text in your PDF.
-
Text Highlight tool: Tapping this selects the highlight tool, where you can highlight text inside your PDF.
-
Underline tool: Tapping this selects the underline tool, where you can underline text inside your PDF.
-
Squiggle tool: Tapping this selects the squiggle tool, where you can underline text inside your PDF with a curly line.
-
Strikethrough tool: Tapping this selects the strikethrough tool, where you can strike out text inside your PDF.
-
Redaction tool: Securely and irrecoverably remove sensitive content from your documents. This tool requires a PDF Viewer Pro subscription.
Free-Text Button:
Lets you decide between the free-text, callout, and the signature tool.
-
Text tool: Tapping it and then on location on the page will let you create a written text.
-
Callout tool: Similar to the text annotation, but this one points to certain location on the PDF.
-
Signature tool: This lets you create an ink signature which you can add to the PDF.
Note Button: Lets you create a note annotation (a comment).
Drawing Button:
This button contains various forms of drawing. Drawings can be customized to your needs. Customizable settings are: Color, Fill Color, Opacity, Thickness, and Line Style.
-
Drawing tool: Lets you draw an ink annotation on the document.
-
Freeform Highlight tool: This is pretty much a second Free Ink Tool, but by default it has a bigger line thickness and a lower opacity (which can be changed) so you can highlight areas with it.
-
Magic Ink tool: Lets you make freehand drawings just like with the regular ink tool, but it also recognizes and cleans up common shapes like arrows and circles.
-
Arrow tool: This lets you draw an arrow annotation. (Which is basically a line annotation with a different line end)
-
Line tool: This lets you draw a line annotation. You can also change the line end and beginning of this.
-
Rectangle tool: Lets you draw a rectangle annotation.
-
Circle tool: Lets you draw a circle annotation.
-
Polygon tool: Lets you draw a polygon (closed shape) with as many lines as you want. Tapping on the button again will finish the creation of this annotation and will connect the beginning and end.
-
Polyline tool: Lets you draw a polyline (open shape) with as many lines as you want.
-
Eraser: With the eraser you can only erase drawings (ink annotations from the Drawing or Freeform Highlight tools).
Multimedia Button:
This lets you add images, stamps, and sound annotation to your document.
-
Image tool: This lets you either take a new picture or choose one from your photo library to add to your PDF.
-
Stamp tool: This will let you add preset stamps or custom text stamps to your document.
-
Saved annotations: This lets you copy and paste annotations into storage so you can reuse them again, even in other documents.
-
Sound tool: This lets you record a sound annotation which you can then add to your PDF.
Multi-selection button: This lets you select multiple annotations which you can then
Undo / Redo buttons: These buttons are very well known. Pressing them will either undo or redo your last action, depending on which one you pressed.
Close button: Closes the annotation toolbar.
Move button: Lets you move to toolbar to other positions (Left, Top, Right).
Thumbnail Grid View
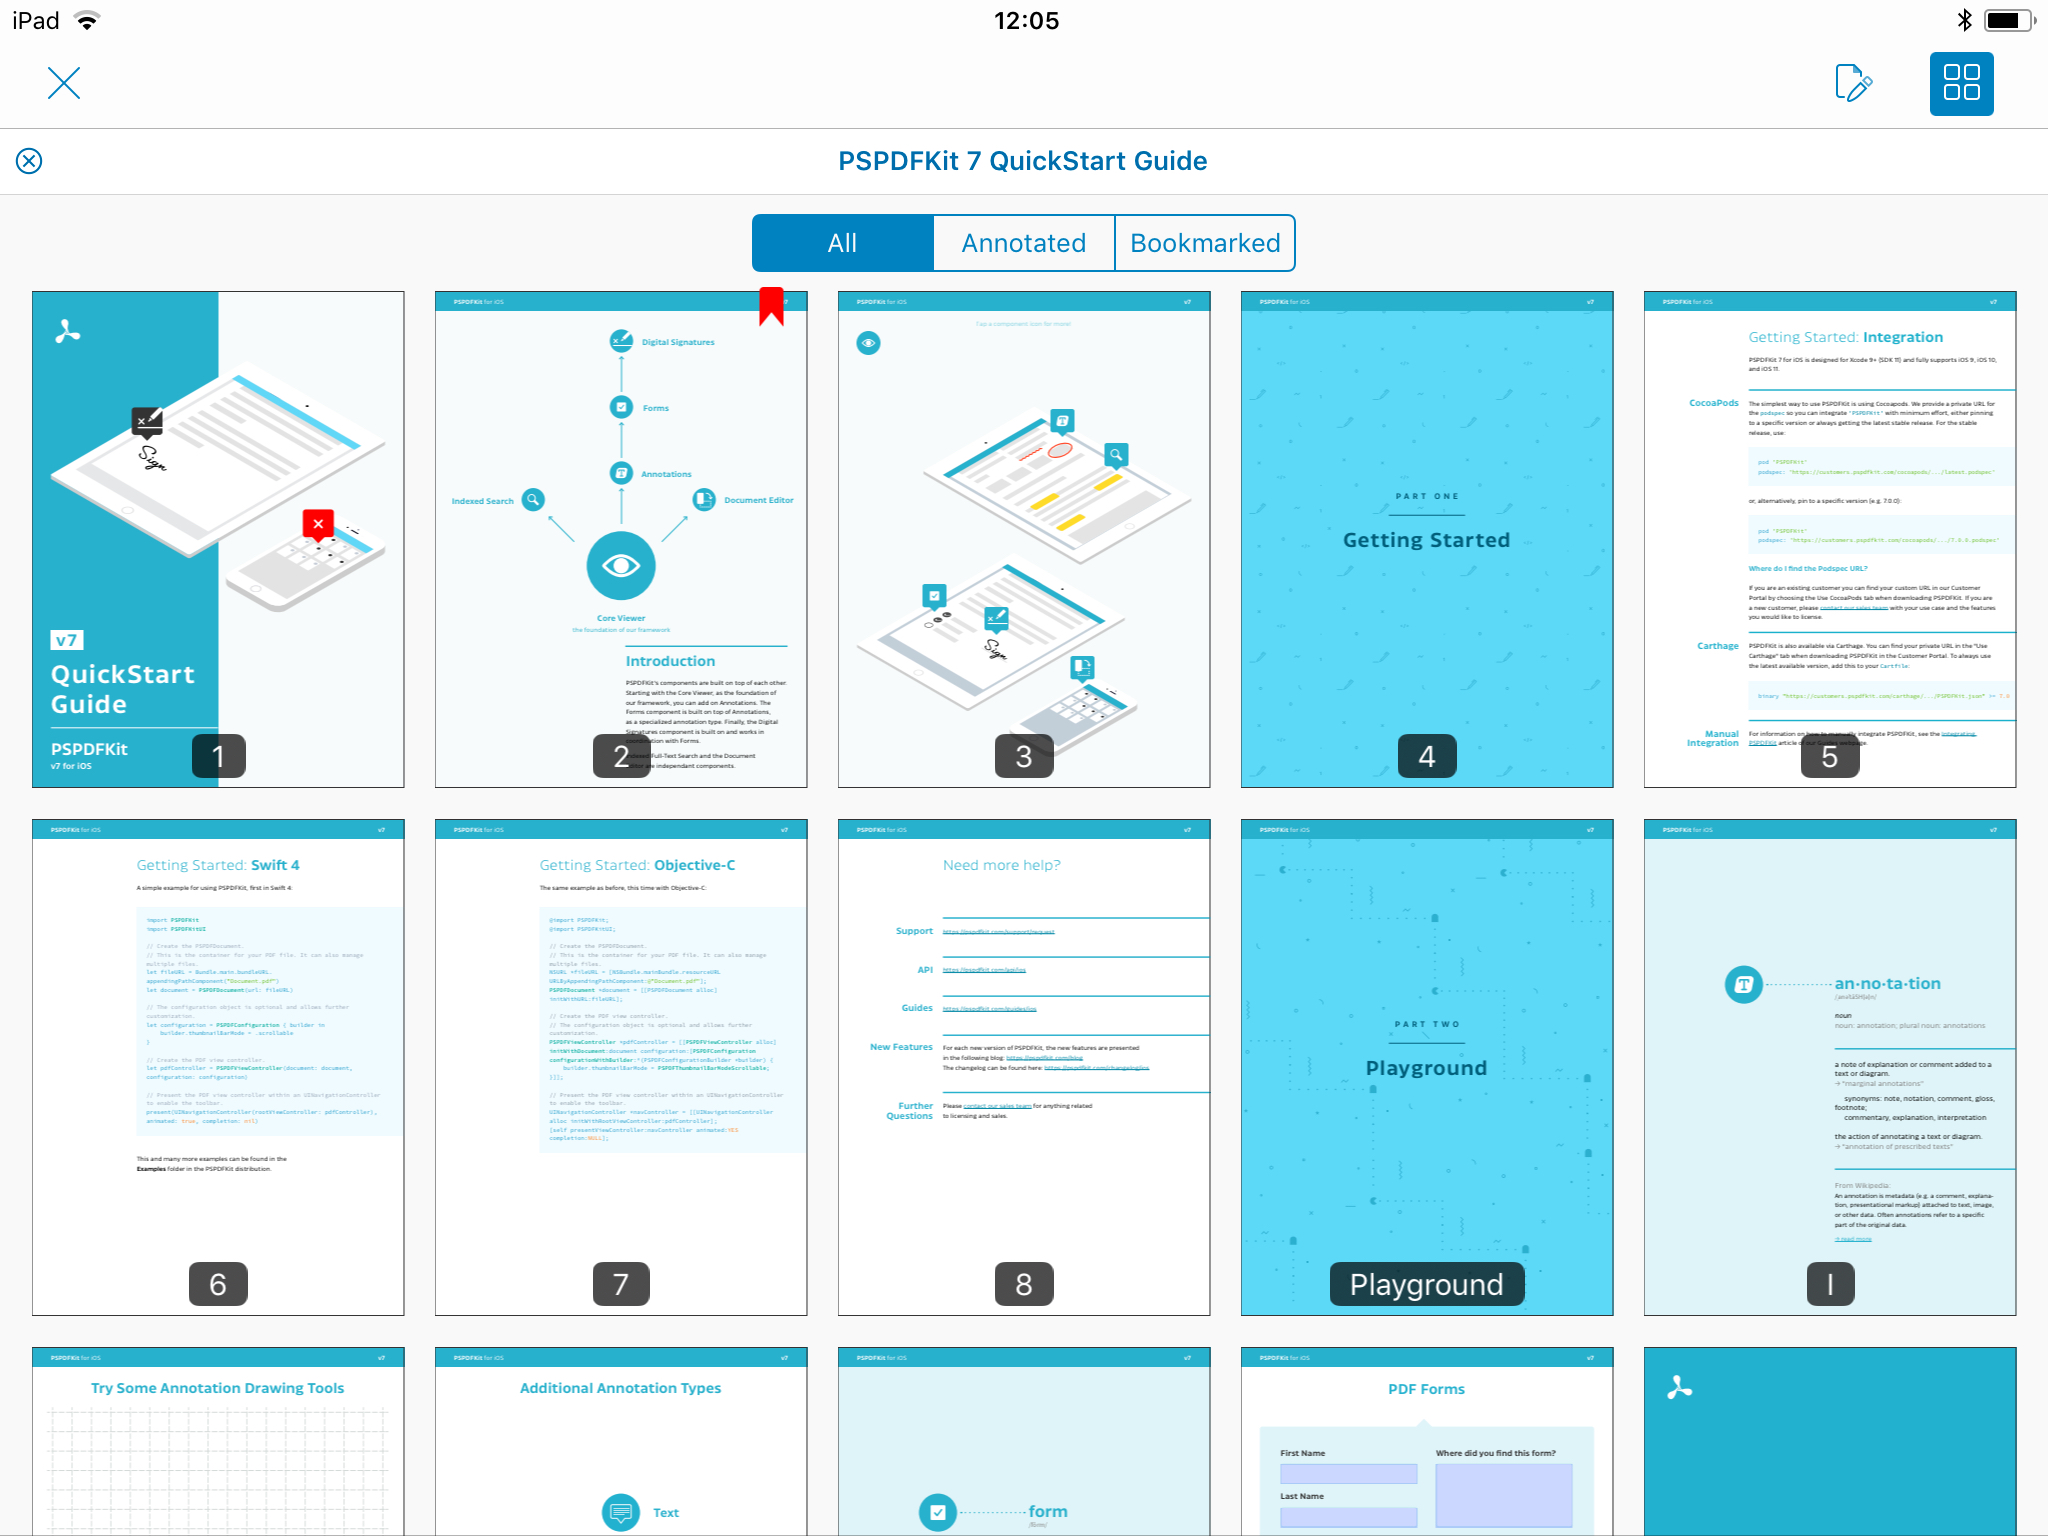
To enter the Thumbnail Grid View you have to tap on the Thumbnail Grid Button in the top toolbar as explained above. In there you can view all your pages very organized and also sort them to only display annotated or bookmarked pages. Tapping on a page will exit the Thumbnail Grid View and you will be back in the PDF Page View.
There are only 2 buttons, the Thumbnail Grid Button, which lets you leave the Thumbnail Grid View, and the Document Editor Button, which lets you enter the Document Editor.
Document Editor
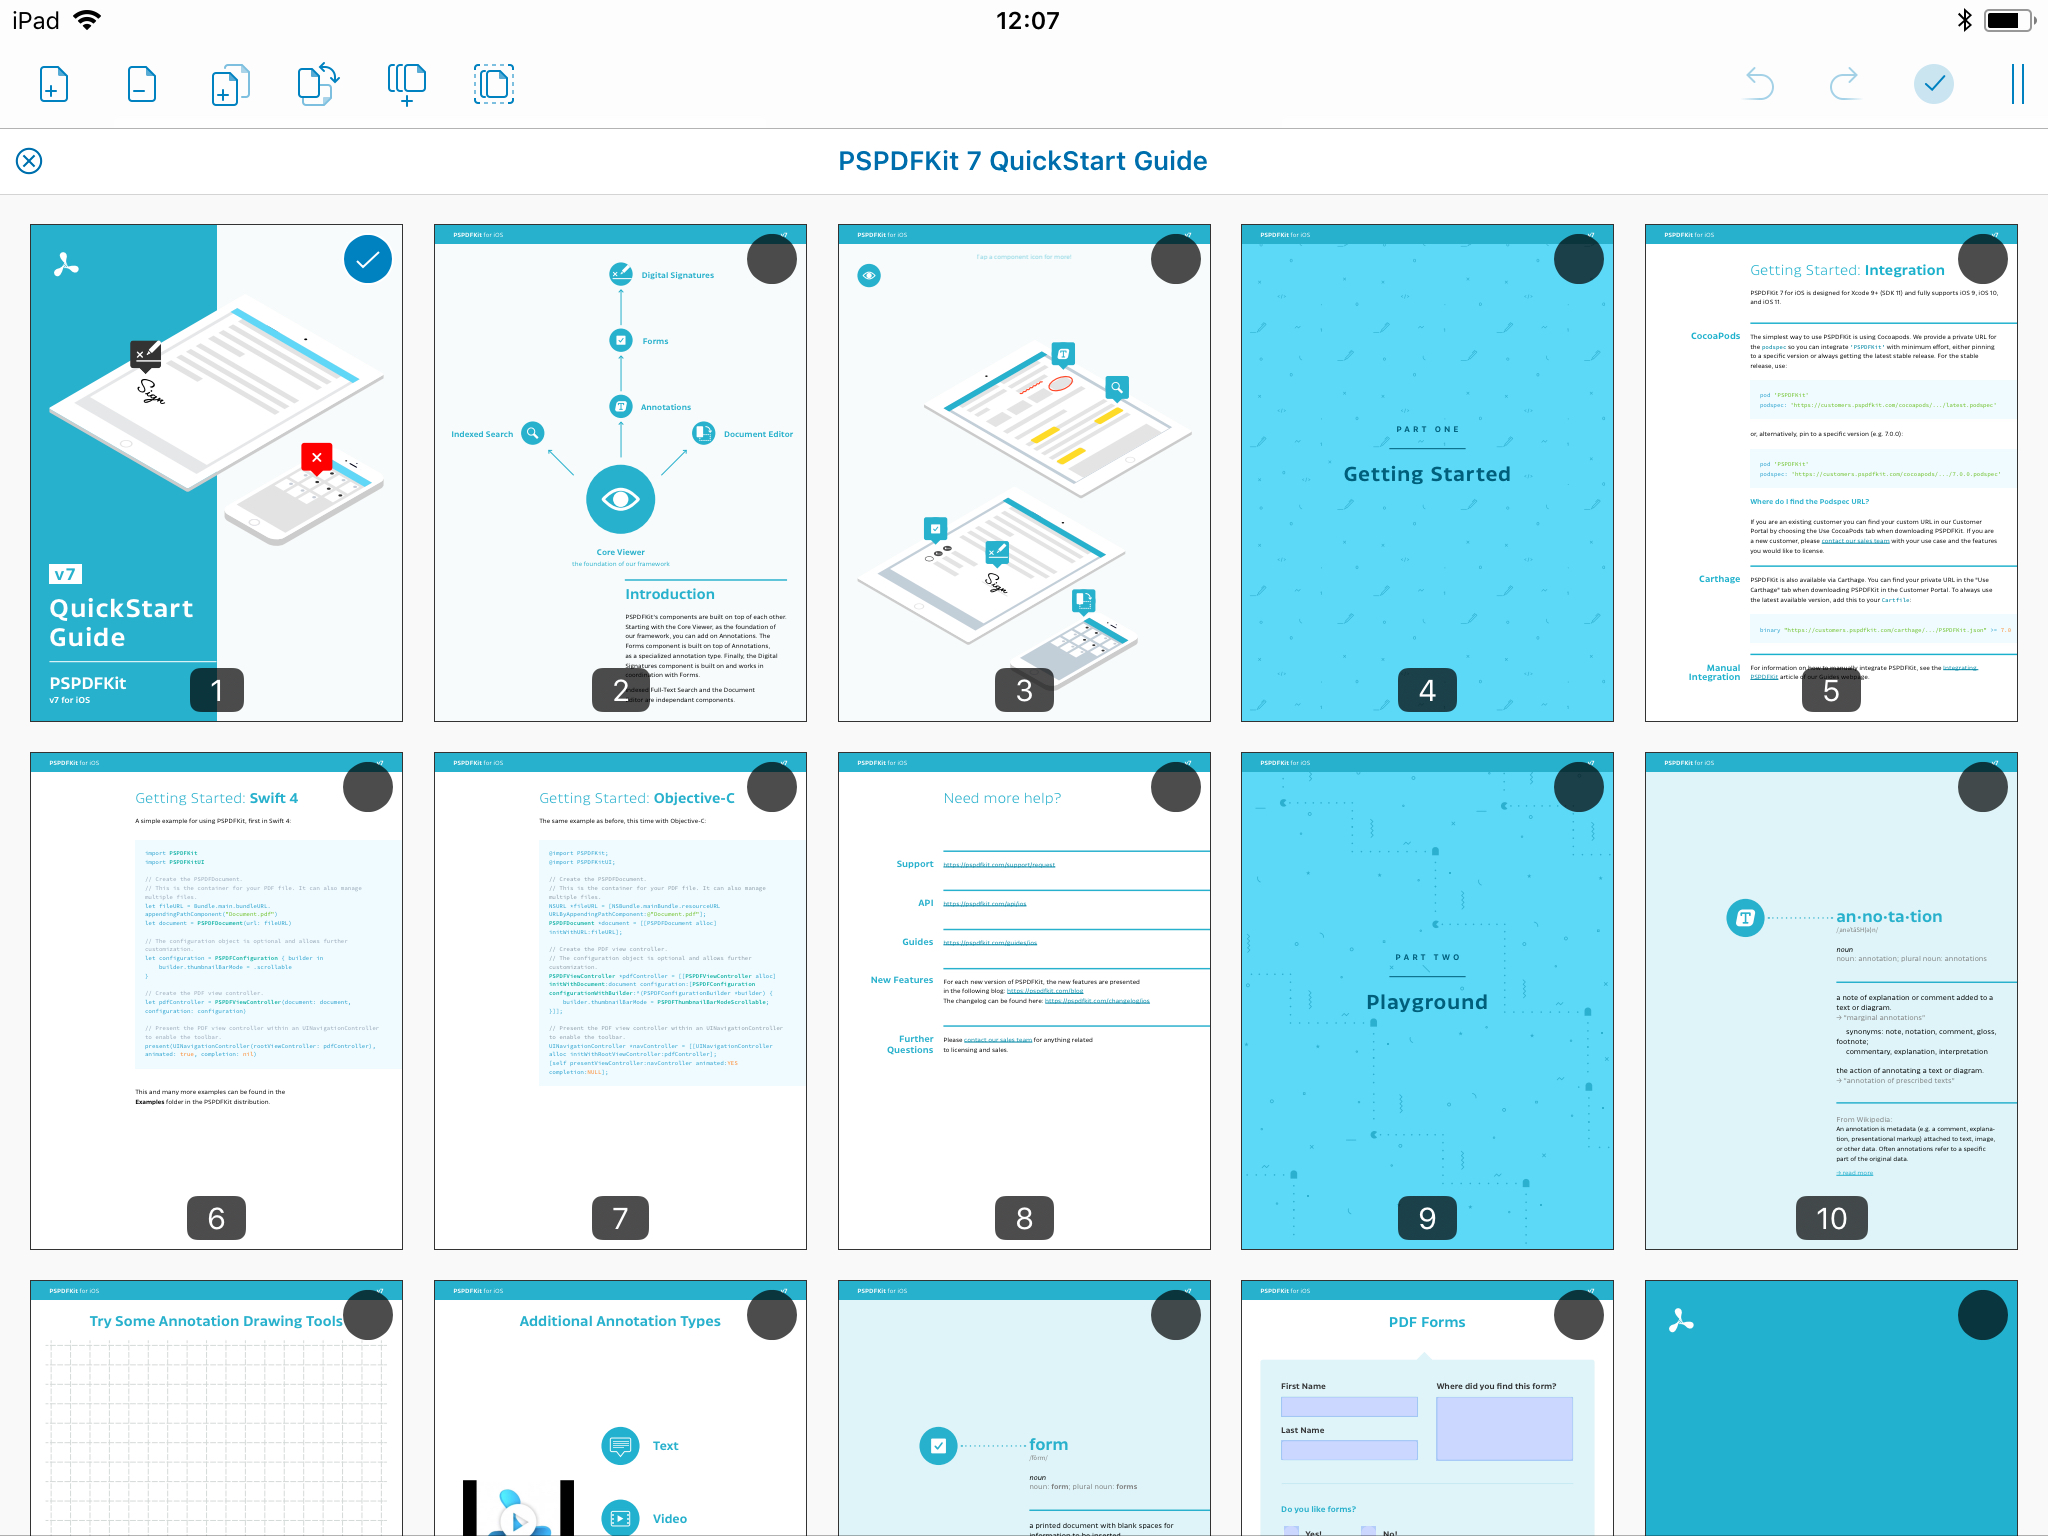
The document editor lets you do amazing things with your PDF, such as re-arranging your PDF, exporting certain pages, duplicating, and many more. To perform actions on the pages, you first have to select the pages by tapping on them. This will add blue checkmark to the page, as seen on the first page in the screenshot above.
Top Toolbar:
Note: The buttons will be explained from left to right.
Add Page Button: Tapping this will open a window where you can create a new custom page, with various background, color, and page size options. This also lets you create a page from an image.
Delete Button: This deletes all selected pages.
Duplicate Button: Tapping this duplicates all selected pages.
Rotate Button: This rotates all selected pages by 90° to the right.
Export Button: This lets you export the selected pages as a separate PDF.
Select All Button: Selects all pages in the PDF.
Undo: Lets you undo the latest action.
Redo: Lets you redo the latest action performed by undo.
Check Button: You want to tap this once you're finished performing any changes to the PDF in the document editor. If changes have been performed and you tap that button, a window will open and you can choose to either save the changes on the current PDF, save the changes as a separate PDF, or to discard any changes performed in the document editor.
Move Button: This toolbar is also flexible, so by tapping and dragging this button you can dock the toolbar to other positions (Left, Top, Right).